The first time I handed an iPad to my kid, I felt a little guilty, but not for the reasons you might think. The way I figured, with such an awesome tool in his tiny hands -- with the collected knowledge of mankind literally at his fingertips -- my child had an unfair advantage over his peers and a fast track to an Ivy League education.
But minutes later, when I had to pry Angry Birds from him like a T-bone from a tiger, I quickly realized that the iPad, for all its potential, was a tool that needed some serious limits placed on it.
Apple must know this too. From the outset, Apple has empowered parents with tools to limit iPods and iOS devices to a restricted set of features that parents can tailor to their child. You can find these Parental Restriction settings by navigating to Settings > General > Restrictions. A video demonstration of how to work these settings can be seen here.
But if you've ever handed an educational math app over to your kid, only to come back and find them playing Need for Speed, then you may want to give Guided Access a try. If you can't see our video tutorial above, try this direct link.
Introduced in iOS 6, Apple's Guided Access feature allows parents, teachers, and people with disabilities, to temporarily restrict the entire device to a single app. The home button is disabled, along with multitasking, allowing users to work within a single app without distraction.
You'll find Guided Access by going to Settings, General, Accessibility, and then scroll down to Guided Access. To get started, flip the switch and tap Set Passcode to create a four-digit passcode, ideally one that your kid won't be able to guess.
Next, find the app you want to lock into Guided Access mode and launch it. Once it's up and running, quickly tap the home button three times.
The road to Guided Access mode on an Apple iPhone. Click for larger image.
(Credit: Donald Bell/CNET)
Now, because apps may contain settings menus or in-app purchase options that you don't want meddled with, Guided Access gives you a chance to mark out any areas on the screen that you want to disable. To do that, simply circle those areas on the screen with your finger.
You also have an options button down across the bottom, giving you a separate menu for disabling the sleep/wake button, volume buttons, touch control, and motion control. By default, sleep and volume are disabled, but touch and motion are left on.
When you're read to lock in the app, press the Start button in the top right. If you disabled any areas of the screen, you'll see those as slightly grayed out. You'll also notice that if you hit the Home Button, a little banner rolls in from the top reminding you that you're in Guided Access mode.
When it's time to put it back to normal, all you have to do is triple-click the home button again, enter that four-digit password you created, and you're free again to use the iPad however you wish.
If you want to set a new app in Guided Access, there's no need to return to the Settings menu. Simply open up the new app and triple-click to turn Guided Access on again.
I hope you find that helpful, though I'm sure you're children will find it infuriating. You can find more iOS tips over at CNET How To.
iOS 7 adds a new interactive layer throughout the operating system. It can best be seen when looking at a wallpaper on your home or lock screens.
When you change the viewing angle of your device by tilting it in any direction, any graphics present on the screen will appear to move. This adds a realistic layer of depth to iOS 7. So realistic, in fact, it reportedly has been making some users sick. Should you be in the motion sick camp, or simply hate the new feature, you can always reduce the motion effects throughout iOS 7.
The perfect parallax wallpaper is one that accounts for the new size (beyond that of the current screen resolution), has some depth to it, and provides a realistic feeling of movement.
(Credit: Screenshot by Jason Cipriani/CNET)
General guidelines You can use a photos taken on your device, which can make for cool-looking wallpapers. Keep in mind they won't conform to the sizes outlined above. You'll need to move the photo around when you're setting it as a wallpaper to get your desired look. In fact, when setting the wallpaper you can preview the parallax effect by tiling your device before you've actually set the photo as a wallpaper.
When using a photo you've taken, try to pick something that has plenty of depth to it. The photo above has an object close in the foreground, with a blurred effect on items in the background. That depth in the photo makes the foremost object (in this case a Lego figurine) appear to move across the screen as I tilt my device.
A standard artistic wallpaper, if you will, needs to also have some depth or texture to it. Look at the backgrounds Apple included with iOS 7. There are some that are nearly single colors, but all have some sort of gradient, pattern, or texture to them to make the most of the parallax effect.
Picking a wallpaper that's a single color, with no depth or texture to it, will all but eliminate the motion effect. But picking a photo with depth to it and that's the proper size will create a true motion effect.
Size it up There seems to be some debate regarding the size of the wallpaper and what results in the best motion on iOS 7. However, the consensus seems to be that adding 200 pixels to each side of the current screen size of any iOS device will result in the best parallax wallpapers.
Here's the suggested size for parallax wallpapers by device (WxH):
iPhone 5/5C/5S: 1,040x1,536
iPhone 4S: 1,040x1,360
iPad (third and fourth gen): 1,936x2,448
iPad Mini: 1,168x1,424
iPod Touch (fifth gen): 1,040x1,536
In order to crop or resize any images for a wallpaper, you can use a program such as Photoshop (which is a bit overkill for something like this) or use a free program such as Gimp.
When you have a larger image, like a photo or a wallpaper you've found online, do not simply resize it to the dimensions above. Pick a center or focal point of the wallpaper, and crop around it to fit the proper dimensions. Resizing will distort your photo, resulting in a wallpaper that won't look good, and you're likely to hate.
And that's it. Once you have a proper photo that's cropped to the right size, you're ready to make some awesome-looking parallax wallpapers. Please come back and share some of them in the comments below!
With the redesign of iOS 7, the color mode to differentiate when a switch is set to on or off has changed. The color of a switch that's off is white, and the color for a switch that's on is green.
Previous versions of iOS also had an On or Off indicator in view when a switch was moved to one side or another. Alas, those labels are gone in iOS 7, but you can add a different type of label should you prefer it. For some, be it due to disabilities or other personal preference, the color-only labels just aren't enough.
Those who would like to add a label will need to launch the Settings app, tap on General followed by Accessibility.
Scrolling down a few lines will reveal an option for "On/Off Labels." As you'll see, this particular switch already has the label present. This gives you an idea what exactly the switch will do. Moving the switch to the right, you'll find that the rest of the switches will also have the on or off indicator present.
This setting doesn't only apply to Apple apps; it applies to every app installed on your iOS device
When Apple unveiled the iPhone 5S, one of the main feature sets shown off during the presentation was the camera improvements. Two of the new features stood out more than others, were slo-mo videos and a new Burst Mode.
Burst Mode will take photos at up to 10 frames per second on the 5S, so you don't miss the best shot. This comes in especially useful when taking a photo of a child, or an action shot and timing isn't easy.
To use Burst Mode on the iPhone 5S, you launch the Camera app and ensure that you're using either the Photo or the Square setting.
Next, frame your shot and then tap and hold on either the shutter release button on the screen, or the volume-up key on your iPhone.
You'll hear the familiar shutter sound, but instead of just one click, you'll hear a rapid series of them. You'll also find a count indicator on the screen next to the shutter button, going up faster than you can count. This count lets you know how many photos you've snapped in a quick burst.
Don't worry, though, the software in the iPhone 5S will group all of the photos from the same burst into one thumbnail. Doing so prevents any clutter in your Camera Roll, especially if you take a long burst of 50 or 60 photos.
(Credit: Screenshot by Jason Cipriani/CNET)
When viewing a set of burst photos, you'll notice a few extra pieces of information on the screen. The first is how you can identify a set of burst photos, complete with a count of photos in the bunch.
(Credit: Screenshot by Jason Cipriani/CNET)
The second is the Favorites text at the bottom. What happens after you take a burst of photos isiOS 7 automatically selects what it thinks is the best photo of the bunch and shows that as the main photo. When you tap on Choose Favorites, you're able to scroll through the photos in the set and select a different favorite, or even select multiple favorites. Doing so will copy your selections and paste them into your Camera Roll where you can then share, edit and do what you'd like with the photos.
Deselecting a favorite photo will remove it from your Camera Roll, without removing the copy stored in the original set of burst photos.
When using an older iOS device you may note you can also hold in the shutter button and it will snap a series of photos. While that behavior is similar to that of the iPhone 5S, it's not near as fast, and you'll also notice that all photos taken are placed in your Camera Roll, instead of being grouped as they are on the 5S.
What do you think of the new Burst Mode on the 5S? Is it something you have used, plan or using or will never use? Have you taken an amazing photo only made possible by Burst Mode? Feel free to share it with us below in the comments
One of the most common questions I've received about iOS 7 beyond that of where Spotlight went, or how to force-close apps, is how to delete for forward messages.
The method to carry out either task has changed a bit from previous versions of iOS, but it's still just as easy.
When in a conversation in the Messages app and you want to delete or forward a message that was sent to you, you simply tap and hold on the message bubble until the options "Copy" and "More..." come up.
Credit: Screenshot by Jason Cipriani/CNET)
Tapping on "More..." will give you the option to forward or delete the message, using the buttons located at the bottom of the screen. You can select multiple messages using the bubbles on the left side of the screen.
Keep in mind that when forwarding multiple messages from multiple parties involved in the conversations iOS 7 won't differentiate the messages. They will be sent as one chunk of text, with no context as to who said what.
When Apple announced that the iPhone 5S was going to come with the ability to capture slow-motion video, I was excited. Slowing down films of my kids has always been something I enjoyed doing, but I had to use various third-party apps or import the clips into iMovie in order to accomplish it. Now, with the iPhone 5S I have a native option to capture, edit and share slo-mo videos. And if you're lucky enough to have found a 5S in stock somewhere, you have the ability to create slo-mo videos with you at all times. Check out these five fun clips of taken with the slo-mo feature if you're not sold on it quite yet.
There are a few tricks, however, that you'll need to know in order to get the most out of the new Slo-Mo feature; let's take a look.
Recording
(Credit: Screenshot by Jason Cipriani/CNET)
Recording a slo-mo video is no different from recording a normal video on any other iOS device. Launch the Camera app, and swipe over to the "Slo-Mo" option. You'll have the normal red record button, but with a circle of lines around it, indicating that Slo-Mo is selected. A solid white line around the red button indicates that your iPhone is set to record normal speed video. You'll also find "120 FPS" next to the shutter release button when it's set to record in slo-mo.
Editing
(Credit: Screenshot by Jason Cipriani/CNET)
After recording a video in Slo-Mo mode, you can immediately edit it in either the Camera or Photos app. Remember that same dotted white circle around the record button? That same indicator will be on the thumbnails of slo-mo videos on your Camera Roll, or stored in your Photos app.
So to slow down the portion of the video you want and not what iOS picked, you simply slide around the edit tool to highlight the section you want slowed down. In the screenshot above, the lines closer together indicate normal playback speed, while the lines that are more spaced out indicate a slo-mo section. Tapping on a thumbnail will let you watch the video, with iOS having preselected a segment of the video to slow down for you. It does a surprisingly good job of picking the best part of the video to slow down, but it's not perfect.
You can preview the video by tapping on the play button and adjust the timing until you're happy.
Sharing
In order for the slo-mo effects to be included with a shared video, you need to use this Share Sheet.
(Credit: Screenshot by Jason Cipriani/CNET)
The worst part of the Slo-Mo feature has to be sharing. With the iPhone 5S recording at 120 frames per second, and requiring either the Camera or Photos app to process and slow down portions of the video to 30fps, sharing can currently only be done through the Share Sheet in the Camera or Photos app. Meaning, you can't launch Facebook or Instagram and select a slo-mo video from our Camera Roll to upload and expect it to have the slo-mo effect still applied.
Instead you have to open your Photos app, select the video and tap on the Share button. From here you'll be able to share with the default list of sharing services such as Facebook, YouTube, Vimeo, Mail, iCloud and Messages. (Notice Twitter is missing from the list.)
In order to share with a service such as Instagram, you need to take a few extra steps. Without the ability to share directly to Instagram from the Photos app, you have to export the video to another service, such as Mail, and then save the clip to your Camera Roll.
In other words, you'll need to e-mail a video to yourself, which does require you to take a hit on the overall video quality, save the attached video to your Camera Roll and then upload it to Instagram or the like.
As MacWorld has pointed out, you can also send the video to another iOS device of your own using AirDrop, or by uploading it to a shared iCloud Photo Stream. For some reason, sending a slo-mo video via iMessage to yourself doesn't apply the effect on the same device, but it does play back properly on another device.
The entire sharing process is just plain weird and frustrating. Until Apple makes some changes to the process, or app developers implement the ability to export slo-mo video (if they even can) into apps, plan on sending yourself a lot of e-mails.
Good digital security inevitably requires some hassle, but the size of that
headache is really up to you. If you’re someone who wants to go all out with
64-character passwords, no Facebook account, and a second laptop that never
connects to the Internet, because it houses all your deep, dark secrets, well,
this guide is not for you.
This is a guide for practical folks. People who want a healthy amount of PC
security (perhaps motivated by ongoing revelations about the National
Security Agency and its surveillance activities), but with a minimum of
hassles such as dealing with key fobs for two-factor authentication, juggling
complicated passwords, and setting up email encryption. We can’t promise you a
completely pain-free experience, but we will show you how to get up and running
with a pretty good security setup that keeps your passwords, email, hard drive
and sensitive USB drives as secure as possible without going
overboard.
A
strong password is the first, best line of defense
Good computer security and privacy begins with strong passwords. Sure, there
are serious criticisms about how online
services use passwords, and Apple may be trying to take biometrics
mainstream with TouchID
on the iPhone 5s, but for now passwords are still the best solution we have for keeping
third parties away from our data.
KeePass
is a great, free option for desktop-based password
management.
The problem with passwords is that they should really be random, unique, and
relatively long to be of any use. That’s where password managers come in: These
programs help you generate random passwords and store them securely, allowing
you to remember just a handful of gnarly 10-character random passphrases instead
of 15 or 20.
KeePass and
LastPass are both good, free password managers that are worth your time. KeePass
is popular because it’s open-source, and it has a few nice features, like
keylogging obfuscation and secure notes.
The problem with KeePass, however, is that it doesn’t have an online
component to sync passwords across devices. That means you’d have to create a
cloud sync setup yourself using Dropbox or another cloud storage service. You
can read more about how to do that with our look at the third-party utility Dropbox
Folder Sync, or by perusing the KeePass plugins library.
LastPass
encrypts your password database before sending it to the
cloud.
Another good alternative—and my personal favorite—is LastPass. Like KeePass,
LastPass offers password generation and encrypted notes, but it also syncs your
encrypted password database to the cloud so you can access it across multiple
devices.
LastPass is available as a free browser plug-in, and you can also use the
LastPass mobile app for $12 per year. Read all the technical details on the LastPass
website.
Password managers are a relatively personal choice and will depend largely on
your own needs and what level of trust you’re willing to put in a commercial
company like LastPass or newcomer Dashlane.
Encrypting
Mail
Most of us prefer to use Web-based email apps like Gmail, because it’s faster
and much easier to open a Web page than to fire up a desktop app. But when you
need to keep your email private from prying eyes, an old-fashioned email desktop
client combined with OpenPGP public-private key encryption is the way to
go.
Email travels across the Internet as plain text by default, which means a
determined snooper could intercept and read your message. Encryption helps
combat this by making it nearly impossible for anyone but the recipient to
decode your message. OpenPGP is an excellent open-source encryption system you
can use to send encrypted email. Problem is, you can only encrypt email to
people who are also using an implementation of OpenPGP. So if you plan on
swapping ciphered mail with someone, make sure they are set up for this as
well.
Encryption is also only as secure as the people using it. If someone decrypts
your mail, copies it as plain text and forwards it on to someone else, the
effectiveness of your encryption is broken. Malware can also ruin encryption by
snatching data in a decrypted state. So remember that while encryption is
definitely more secure than plain old email, it isnot foolproof.
Finally, keep in mind that email
metadata is never encrypted. So you won’t be able to hide the subject line
or the email address of the person you’re corresponding with.
The first step is to download and install the Mozilla Thunderbird email
client for the account you want to use for encryption and email signing.
Thunderbird has a plug-in that makes it particularly easy to set up OpenPGP.
(PGP’s inventor also recommends HushMail.) Next, download and
install the OpenPGP key management software Gpg4win.
Creating your own key
pair
Start Thunderbird, click the menu icon in the far right corner, and
select Add-ons. In the next window that
opens, search for Enigmail and
click Install. After Enigmail
installation is complete, shut down Thunderbird and then open the program
again.
Now you’ve got all the tools you’ll need to create your own key pair. Go back
to the menu icon in the far right corner and select OpenPGP > Key
Management.
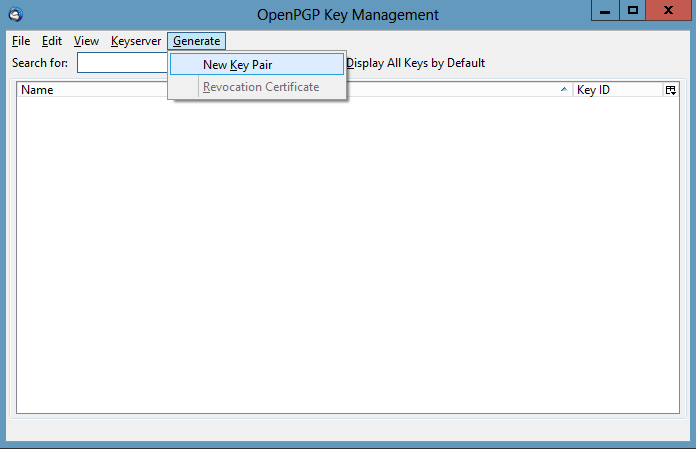
When the Key Management window opens, select Generate > New Key Pair.
Enigmail’s
Key Management window lets you create and revoke new key pairs for your
account.
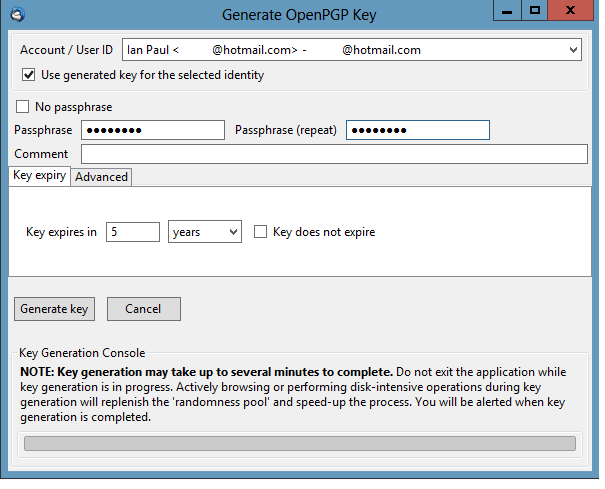
Now we’re just about to generate our first encryption key pair. Most of the
default settings in this window should be fine. However, I would highly
recommend creating a passphrase for your keys. If you don’t and one day
Thunderbird decides to ask you for a password even though you don’t have one (it
happened to me), you’ll be heading for a world of frustration.
When you’re ready to enter the fabulous world of OpenPGP email, click the Generate keybutton. After a few minutes,
your key pair will be ready.
Save
yourself some trouble and create a password.
Once your key pair is done, Enigmail will suggest you create a revocation
certificate. This is an extremely important step that I suggest you take: A
revocation certificate is a simple file with the .ASC extension that you can use
to invalidate your keys, should you forget your password or lose control of your
computer.
Best practices say you should save the certificate to a USB thumb drive and
then keep that thumb drive in a safe place.
Go
public
Now that your key pair and revocation certificate are ready, you need to let
the world know you’re accepting encrypted email. The best way to do that is to
upload your public key to a keyserver where other users can find it—it’s sort of
like a phone book for security-minded people.
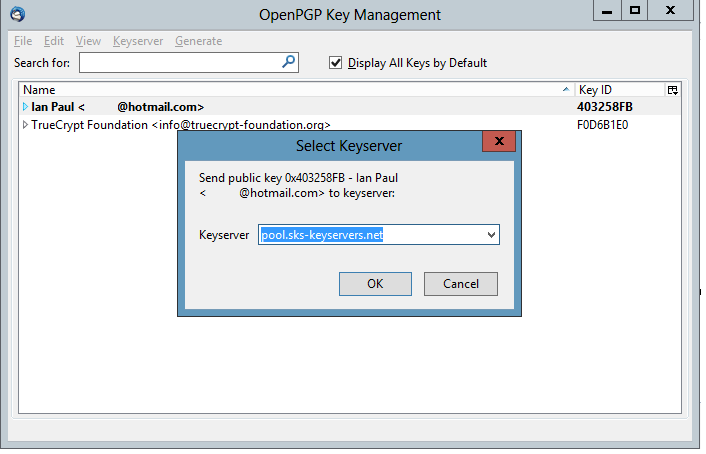
Uploading
your public key to a keyserver is a good way to get the news
out.
To do this, open the Key Management window again—if it isn’t already open—and
selectKeyserver > Upload Public
Keys.
By default, Enigmail will suggest you upload your key to
“pool.sks-keyservers.net.” That should be fine, since this isn’t actually a
keyserver at all, but a hub that pools its database with multiple keyservers.You
can change this by clicking on the drop-down menu. Another option, for example,
is to upload directly to MIT’s keyserver.
You could also publish your public key on a personal website, Tumblr, or
blog. To copy your public key, go back to the Key Management window, make sure
the Display All Keys by Default checkbox
is marked, and then highlight your email account once it appears. Next,
right-click and select Copy Public Keys to
Clipboard.
Testing,
testing
So you’ve generated a new key pair and published your public key. Now it’s
time for a test run by sending a signed email to Adele, the friendly OpenPGP
email robot.
Hold down the shift button on your keyboard and then click on the Write button in the top left side of
Thunderbird. This will open a new message window without any HTML formatting.
Adele can only handle plain text, so bold headlines, italics, and embedded links
are out. In fact, for simplicity’s sake, it’s always easier to create encrypted
email as plain text.
Send
a test message to Adele the email bot to make sure your settings are working
correctly.
Next, fill out Adele’s email address, which is adele-en@gnupp.de.
Create a subject line and message body with whatever you’d like to say. Then
click the OpenPGP menu option, and make
sure that only the “Sign Message” and “Attach My Public Key” options are
selected. Hit Send, enter your password,
and you’re done. In a few minutes, Adele should send you a reply to confirm
whether your signing was successful.
Once Adele gives you the okay, you are ready for the world of encrypted
email.